OK, I am not a board & batten professional…
Like, NOT AT ALL…
So please don’t think that because I am posting this tutorial that I
have all the answers to all of your board & batten dilemmas…
I will do my best to answer any questions that you all have, but there are a ton of fabulous tutorials out there in blogland, so if you are in the looking to try the board & batten thing in your own home, my suggestion would be to research as many different tutorials as you can….
Now, with that being said, here is what I DO KNOW…..
One of my very devoted readers & friend let me in on a little secret…
You can go to your local post office & ask for a
“change of address packet”
It looks something like this…
They are free & you can get as many as you want!
(Seriously, the guy working asked me how many I wanted!!)
Inside these little packets are these…
A 10% off coupon to Lowes!!
{FABULOUS!}
I know its not a lot, but it definitely takes care of the tax on your purchase & maybe even a little more! I don’t know about you, but I will take savings whereever I can get it!! I definitely will be picking one of these packets up everytime I get ready to start a project from now on!!
(Thank you Kasey!)
So after stopping at the post office, we were off to Lowes!!!
Like I said earlier, there are a TON of different B&B tutorials out there and if you research them, you will find that a lot of people use a lot of different things to get the board & batten look. You can seriously approach it a variety of ways, but still get the same look…
This is what we purchased:
(sorry for the crappy cell phone pics!)
11 – 1x2x8 Whitewood Boards (for battens) = $21.89
and..
3 – 1x4x12 Whitewood Boards (for baseboards & header) = $13.05
Total Cost = $34.94 (without tax)
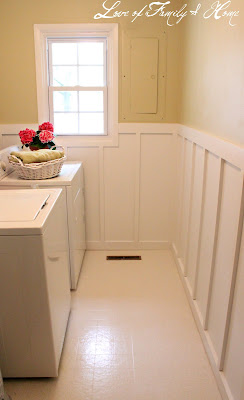
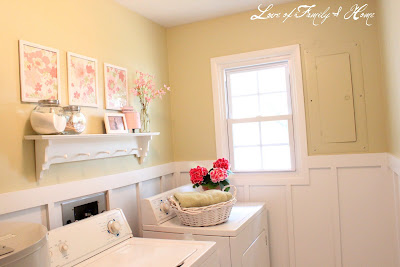
We decided to go the faux board & batten route (no boards) and just use are existing walls instead. So all we had to do was add the baseboard, battens, & header. When we got home, I cleared out the laundry room, my hubby ripped up our existing baseboards and put the new 1×4’s down in their place…
This is VERY IMPORTANT…
Make sure that when you put the new baseboards down that you don’t rely on your floor to make sure that they are level. We learned this the hard way & realized half way down the first wall that something was off! After realizing this & correcting it, things went pretty smoothly after that!!
Once the baseboards are down you need to decide how high to go up with your battens & take into account your header as well. After researching other tutorials, I found that most people go up 4 to 4.5 feet, but you have to take into account outlets and other obstacles in the room. We had to work around the electrical panel & the washer & dryer hook-up. I decided I wanted the B&B to hit right under the electrical box and over the washer & dryer hook-up, so after taking all of that into account we ended up at 50 inches total height. Once the baseboards were down (& level), we started with two battens splitting the corner of the room….
(also just a side note…we did not miter any of the corners, everything is just overlapped)
Once we had the first two battens up, we just spaced the rest of the battens every 12 inches. You can actually tape them to the wall until you have your spacing all figured out & then nail them to the wall once you have them just the way you want them…we did it this way & it worked great!
When it came to the wall with the washer & dryer hook-ups we had to get a little creative with our spacing, the battens on that wall are not all exactly 12 inches apart, but as an outsider looking in…
you would never be able to tell!!
After everything was up, I started filling all of our nail holes with spackling and then began priming! I used a KILZ 2 primer that I already had laying around in our garage. I used 3 coats of primer total.
Even with just the primer…it was already starting to look fabulous!!!
Then I used a white semi-gloss paint (used for trim) to finish off the look…
Its also important to go through & caulk between the battens & the wall to help ensure their security & also seal all of the cracks!!
I also gave the upper wall a fresh coat of “Lima Bean” colored paint to brighten up my new space!!
Many of you asked about this color, I did not purchase it a chain home improvement store. It was bought at a local home improvement store here in our hometown. I actually bought it a couple of years back for a different project & they don’t even carry it anymore! I happened to have the old can laying around & took it in to have it matched. For those of you wanting to use this color for your own project, this is the color info on the can:
BLU – 1
RUM – 11
YEL – 9
Hope that helps!!
I have also been known to mail paint samples to my readers in the mail if you anyone is interested!
I would be happy to help you all out! 🙂
If you want to see more of my laundry room transformation you can click here.
Hope this tutorial gave you some insight into the board & batten world!! If you have any questions, feel free to leave them in the comments section or shoot me an email!
I will do my best to answer them!!
Have a great week everyone!!
Linking up here….









I have a question about your baseboard and if there is any overlap from the baseboard and the door frame. I am wanting to do this in our kitchen but realized that the baseboard is wider then the door frames, therefore it does not butt up against the frame well. Please email me as I am very curious as how yours turned out and I am a a stand still with my project beCause of this. Thanks! Krista
Kristalynn205@aol.com
Good day! I simply wish to give a huge thumbs up for the good information you will have here on
this post. I will likely be coming again to your blog for more soon.
My website … free aol online music videos
Whats up! I simply wish to give a huge thumbs up for the good info you could have right here on this post.
I can be coming back to your weblog for more soon.
my web site lacoste bags women canada
Good day! I just wish to give a huge thumbs up for the nice data you may have here on this
post. I might be coming back to your blog for extra soon.
my web site: fabric shower curtain liner with suction cups