Hey Everyone!
I hope you all are having a great week!! I wanted to say “Thank You” for all your sweet comments regarding my Teal & Yellow Fall Tablescape!!
I’m glad you all love it as much as I do!! 🙂
I promised a couple of tutorials to show you how I created the centerpiece & also the napkin rings for this tablescape, so I thought I would do that today!
First, I wanted to show you my inspiration picture for the centerpiece project…..
Source: beneathmyheart.net via Tonya @ Love of Family on Pinterest
I saw this image on my friend, Traci’s Blog, during her Favorite “Pins” Friday Segment a couple weeks ago. Isn’t it beautiful?! It was exactly what I was envisioning for my own table, just on a much smaller scale!
So, first, I was gonna need a wooden box…..or so I thought!
While out doing some shopping with my mom, I was talking with her about this project & describing to her what I was wanting. I was just gonna purchase a wooden box if I could find one, if not, I was gonna build one. Then, my mom spotted this in one of the aisles of the store we were in…..
It was exactly the size I was needing & after asking one of the sales associates for permission, I took it home with me for FREE! 🙂 My mom….she’s a genius, I tell ya!
Then I gave the box 2 coats of “Midnight Garden” craft paint using a sponge brush….
I didn’t paint the inside of the box or the bottom, as I knew those areas wouldn’t be seen.
When the box was dry, I started adding my goodies to the inside!
I bought three “pint size” yellow mums at Lowes for just 88 cents a piece & spaced them evenly inside the box. I left them in the containers that I purchased them in so that I could take them out to water them as needed & then put them back inside the box. Then, I took some floral foam that I bought at Walmart, cut it to the size I needed, & then stuck it down inside the box in between the mums.
Once I had the foam in place, I then place my candles down inside the box as well…
I bought the candles at Walmart. The pillar candles were $2.97 a piece & the taper candles were 75 cents a piece. I ended up using four taper candles total, but you only see 2 in this picture. After I snapped this photo, I decided to add two more & placed them on opposite sides of the pillar candles. The pillar candles just sat on top of the floral foam, where as the taper candles went down inside of the foam so that they stood nice & sturdy!
Next, I purchased some fall berry picks at Hobby Lobby to coordinate with colors I was using. They were $2.47 a piece, but I got them 50% off. I bought four total & added them to my box, just spacing them evenly throughout & sticking each one down into the floral foam….
I also purchased some brown wheat & dried baby’ s breath from Hobby Lobby….
This large bundle was originally $6.99, but I used a 40% off coupon for it.
In order to be able to work this into my arrangement, I also bought some wooden picks….
These can be found in the floral department of any craft/hobby store. I bought mine at Hobby Lobby.
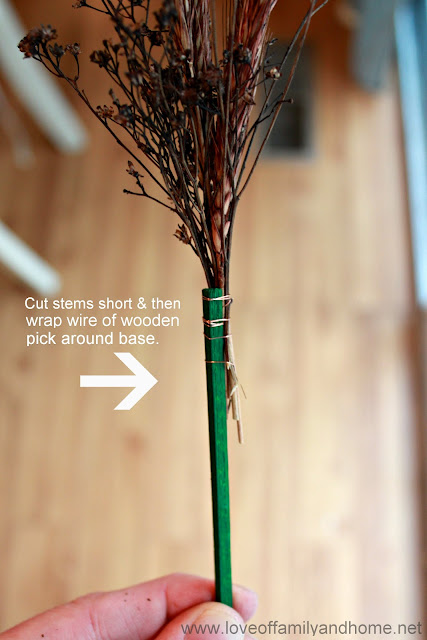
The wooden picks are what goes down into the floral foam. So, to use them, I just cut small groupings of wheat & baby’s breath down to size & wrapped the wire (provided with the picks) around the base of each grouping.
And then, this is where I kinda stopped taking pictures!!
Bad, bad blogger!!!
Anyway….
I just gonna kind of show you picks of the completed arrangment & walk you through the rest, so you can see what I’m talking about….ummmkay?! So, if you look in the pictures below, you can see where I just kind of used the wheat & baby’s breath as a “filler.” I mainly used it in & around the candles to fill in the gaps there.
Then, I found some old leaf garland in with my fall decor items I had stored away! I ended up taking the yellow/green leaves off of the garland & started sticking them down inside the box to bring in a little more color to the display….
The leaves are not secured into the floral foam, but rather just tucked inside the box instead.
And last but not least, I went through the arrangement & nestled in some pine cones & acorns that I bought in a bag at Dollar General for around $3.00 & placed them down inside the arrangement.
If you look closely, you can see the top of an acorn on the left 🙂
I hope that gives you a pretty good idea of how it all came together!!
Yes?! No?!
I hope so!!!
Nows, as for the napkin rings….
This is how it went down…..
I grabbed an empty toilet paper roll & cut it into four (somewhat) equal parts….

Then I grabbed some scrap burlap that I had laying around the house, cut it into thin strips & hot glued them around each “napkin ring.”
Last, I found some little pine cones that I had on an old wreath & hot glued them onto the napkin ring to dress them up a bit more.
That’s it!! Easy Peasy!!!
If you don’t have pine cones, you could also use some little acorns!
I think that would be really cute as well!!
Ever seen the old toilet paper roll turned napkin ring trick before?!
Ever made napkin rings from a toilet paper roll?!
I hope I was able to provide you with some ideas for your own Fall Tablescape & I hope you found these tutorials easy to follow!!
Thanks for stopping by!!
Linking up here….
Weekend Wrap-Up Party at Tatertots & Jello
Tips & Tutorials Tuesday at Home Stories A to Z
Easy Fall Decor Party at Thrifty Decor Chick







Love this idea!!! It looks fabulous:) I like how you used cardboard as a holder. I’m pinning this for later. Thanks for this idea!!!
You rock! That turned out absolutely beautiful!!! You’ve never guess what they were made out of!
–Katie
@ Creatively Living
So Cute!
I never would have guessed that cardboard was your base for both of these!! You’re a genius! I’ve never seen cardboard made to look so elegant–excellent job. Now, would you mind too much if you’re copied?
Thank you for the great tutorials, I’m definietly going to try the napkinrings…the cardboard container is adorable and is really a nifty way to get what you want, love the color too!
This is so awesome! I can’t believe you used a cardboard box and toilet paper roll. Your table just looks amazing and I LOVE those napkins you found. Thanks for sharing such great ideas.
Lori : )
Thrifty Decor Mom
lOVE your idea with using the box but i esp love how you used the TP rings! your centerpiece turned out great and double bonus that it was thrifty.
Tonya, your centerpiece is awesome, and your mother…a genius!!! I love that idea. I have a long basket about the size of your box. *wink wink*
i love the burlap napkin rings! great work! the whole thing looks so elegant ♥
Love this Tonya! I would have never guessed that the centerpiece was a cardboard box – wow!! I so want to build a box like Sarah/TDC’s box 🙂 Just haven’t done it yet. Maybe I will in my Pinterest series 🙂
And the burlap toilet paper napkin rings!! I am so doing that too! Since for some reason it is my job to change out the toilet paper??? (Does everyone’s husband’s do that – leave an empty roll??) I should have my rolls in no time 🙂
Beautiful table and I love that you did it on a budget. 🙂
Looks great! Love the supplies you used to keep it simple, it does not look simple, it looks elegant!