Rustic Fall Centerpiece Tutorial

46 Flares 46 Flares ×
 Hey Friends!
Did you all have good weekend?!
I wanted to share another Fall Centerpiece Idea with you today. This one is super easy to make & also inexpensive in terms of materials. If may also look a bit familiar to you….
Pin It
If you’ve been around these parts for a while, you probably remember the Rustic/Chic Fall Wedding that my mom & I decorated for last year. This centerpiece was one we did for the wedding, and was one of my favorite parts of the decor for that event.

I see this centerpiece getting pinned on Pinterest over & over again, but realized that I never did a tutorial to show you all how to make it! My bad! So, I thought I would take that opportunity to recreate one for my OWN home & go through the steps to show you all how you can make one too! 🙂

Are you with me?!

Here we go….
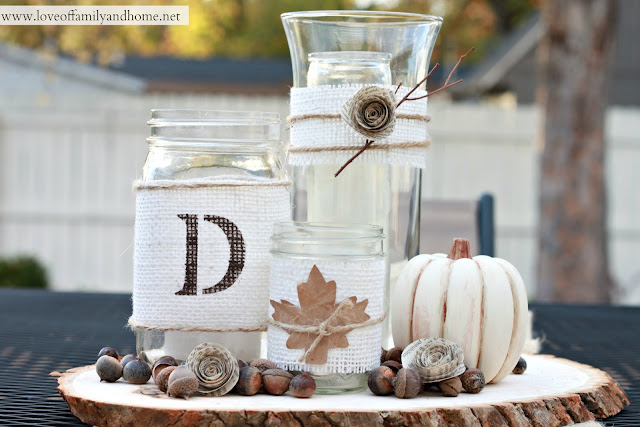
I started with 3 glass jars. A tall cylinder type jar from the dollar tree, a regular sized mason jar, & a smaller jelly jar. You don’t have to use these exact containers, but instead just look for something similar. You could easily find similar jars in a thrift store.
The rest of my supplies…..
White Burlap
Jute/Twine
Book Pages
Monogram Stencil
Craft Paint
Stencil Brush
Hot Glue Gun (not pictured)
Brown Paper Bag (not pictured)
I’m gonna go through & show you how I decorated each individual jar starting with the regular sized mason jar. First, cut a piece of burlap wide enough to cover the width of the jar & long enough to wrap around it. Then, cut two pieces of jute to that same length to use as trim.
Set aside the jute & grab your mongram stencil.  Place it in the middle of the burlap & stencil the monogram to the burlap using the craft paint & stencil brush. If you don’t have a stencil brush available, you could easily use a craft size paint brush.
It should look something like this…..
Give the monogram a couple minutes to dry & then add your jute trim using your hot glue gun. Once the trim pieces are attached, wrap the burlap monogram around the mason jar & secure with hot glue.
Now we move onto the tall cylinder jar. You’ll cut another piece of burlap, this piece should be quite a bit narrower….
Wrap around the jar & hot glue.
Then cut two pieces of twine long enough to wrap around the jar and hot glue them around the cylinder as shown….
Now, we are gonna make roses out of book pages to adorn the cylinder. First cut a circle out of the book page. Then cut the circle in a spiral pattern as shown here.
Starting at the outside edge of the circle, begin rolling the paper towards the center.
Continue rolling until you are to the small circle at the end of the spiral. Add a little hot glue to the circle & attach the rolled paper to it. The rolled paper should loosen a bit when you let go of it.
You should be left with something like this….
You’ll want to make three of these total. One will go on the cylinder & the other two will go on the table surrounding the centerpiece.
Hot glue the paper rose to the glass jar & if you’d like, add a little twig for some extra cuteness! 🙂
The last jar to decorate is the little jelly jar! Cut one one more piece of burlap. Again, cut it wide enough to cover the jar & long enough to wrap around it.
Grab some brown paper (you can use a brown paper bag) & cut out a leaf. I used a leaf cookie cutter that I had on hand, but you could just grab a small leaf out of your yard & use it for your pattern!
Just to make it look a little more real & give it some dimension, I rolled the paper leaf up in my hand to wrinkle it. I also folded some creases in it.
Wrap the burlap around the jelly jar & secure with hot glue. Also hot glue your paper leaf to the jar. Then cut a piece of jute to wrap around the jar & tie a little knot to secure it.
On the jelly jar & the glass cylinder, I pulled on the edges of the burlap to cause them to fray a little bit. You don’t have to do this to yours if you don’t want to, but I like the way the frayed burlap looks. 🙂
Then add your candles to the the jars & put your centerpiece together….
I had this piece of log?! Wood?! I don’t know what to call it! It was leftover from another project, so I thought I would use it! I bought it at Hobby Lobby with a 40% off coupon. I think it makes a great addition to the centerpiece! You wouldn’t have to use it though. When we decorated for the wedding, the centerpiece just went straight on the table & it looked great like that as well! The little pumpkin was one that I already had.
I also gathered some acorns from my mom’s yard to adorn the bottom of the centerpiece. Even though they are little, I think they add a lot! It’s a little touch of wilderness & you can’t beat the fact that they are FREE! 🙂
The extra paper roses just get nestled into the acorns….
I just love this centerpiece! It’s rustic, but I think the paper roses add that little bit of chic-ness!
I think it looks pretty cute sitting on our outdoor table as well! 🙂
I hope you enjoyed this tutorial!
Pin It
I also hope that I inspired you to give it a whirl!
It would be beautiful on your table this Thanksgiving!!
And boy would your guests be impressed! 🙂
What is your favorite part of this centerpiece?!
Thanks so much for stopping by!!

I hope you have a Terrific Tuesday!!!

Linking up here…
Grace At Home at Imparting Grace
Happy Hour Linky Party at Craftberry Bush
Better Mom Monday at The Better Mom
Before & After Party at Thrifty Decor Chick
Weekend Wrap-Up Party at Tatertots & Jello

 Fall Crafts Party at The Lettered Cottage
Fall Tablescapes & Vignette Party at Centsational Girl
Related Posts Plugin for WordPress, Blogger...

Comments

  1. I’m wondering how big your wood slice is? I’m doing the same sort of thing for my daughter’s “rustic winter wonderland” wedding in Dec. I found a tree yesterday, but it’s diameter is 19 inches. It’s really big, but it is for a 60 inch round table.

    • Hi Michelle! The wood slice is kinda oval shaped. Mine measures 15 inches long & 10.5 inches wide.

    • Thanks for the info, Tonya! Your wood slice is much bigger than the one I did my “trial run” with. I think I’m going to have to mark something off and get a visual. 🙂

  2. Absolutely love this centerpiece…would be perfect for a fall wedding/gathering.

  3. Anonymous says:

    I loved the way it turned out for the wedding we did and I love it now as well! It would be beautiful for a centerpiece for Thanksgiving!!!!

    Love,
    mom

  4. This is so cute! I’ve been thinking of what I want to do for a Thanksgiving centerpiece this year. This is perfect. I’ll send you pics when I do it. LOL! Thanks! Lisa~

  5. I absolutely love it!! Gorgeous! Pinning it for sure!

  6. Ok, this is too stinkin’ cute. AND the roses… I DIE! 🙂 I must make millions of those RIGHT NOW. LOL! Good job!

  7. Gorgeous – especially love the giant wood/log thingy everything is sitting on!
    Kelly

  8. Really love how that center piece turned out! I’m totally in awe on how those roses are made. I’m going to try to do it so if I mess up Tonya’s I will be calling you. Thanks again for more great ideas I look forward to them.

    Nancy

  9. Looks awesome, Tonya! Love the rustic look!

  10. Super cute, Tonya! I think I just found my Thanksgiving centerpiece!!!

  11. Gorgeous Tonya…as usual…xo

  12. This is so beautiful! Totally my style. I love the tree trunk, the neutral tones and the earthy accents. So beautiful!

  13. This is adorable and so creative!

  14. Beautiful!! Love all of the nature elements and different textures. Have a wonderful weekend!
    Jenn 🙂

  15. So pretty! I love that its so simple and inexpensive, yet chic!
    Would love if you came and linked up with us. We’re giving away one free week of ad space for one lucky feature, and our blog gets thousands of hits per day! Hope to see you there!

    http://www.oneprojectcloser.com/the-humble-brag-link-party-4/

  16. Just adorable, Tonya, and super-simple and easy! I’m pinning for next year, because I am so “FINISHED” with decorating for Fall this year…..lol!

  17. I just found you via Better Mom! Love your ideas, I did something similar with some thanksgiving decor last year! I’m a new follower, love your ideas! Treasure Jesus Above all Else!

  18. Love the paper roses and the burlap! So cute and rustic! Found you through the Better Mom:)

  19. TONYA! This is absolutely beautiful. Every element adds something, and it ALL adds up to a gorgeous centerpiece. Thanks so much for linking this to Grace at Home!

  20. beautiful Tonya ~ Richella, shared your creation at Imparting Grace and the rustic wood texture I love along with the simplicity!

  21. I LOVE this – it’s so beautiful. Thanks for the tutorial!! Going to link from my next blog post! 🙂
    – Claire

  22. That is really beautiful, I love how you have used the old jars. Thanks for sharing

  23. joann jeglie says:

    Love the pumpkins with flowers in them! Can you tell me how to do it without the pumpkins spoiling please? My daughter wants these for her wedding in October. Thank you so much

    • Hi Joann! We didn’t use real pumpkins. We used fake pumpkins (they had a styrofoam center) that we had purchased at Hobby Lobby. We painted them the cream color you see in the photos. As far as the flowers you see on top, we stuck the sticks down into the styrofoam pumpkins & then made flower rings to go around the sticks using paper plates. We glued the flowers to the plate with hot glue. The flower rings just sat on top on the pumpkins.

  24. Hi Tonya,

    What a cute project! I love it so much that I decided to feature it in our roundup of rustic fall crafts! Check it out here: http://www.favecraftsblog.com/rustic-fall-crafts/

    Have a great day!

  25. What a cute project! I love it so much that I decided to feature it in our roundup of rustic fall crafts! Check it out here: http://www.favecraftsblog.com/rustic-fall-crafts/

    Have a great day!

  26. Bravo pour ces réalisations et merci pour les tutos
    J’adore les roses en papiers.
    bonne journée
    Corinne

  27. Could I find logs somewhere in the store to use for the bottom of the center piece? I’ve been looking for something simple yet unique for my wedding that is in October of this year and this is awesome!

  28. Catrina Hill says:

    Hi i came across your page and love this centerpiece! I was gonna use it for my fall wedding and was wondering what size glassware you used. Thank you sooooo much!!!

  29. Beautiful center piece. You are very creative

Trackbacks

  1. […] accent to any wedding. These rustic fall centerpieces are no exception. Learn how to make your own rustic fall centerpiece at Love of Family and Home. Add these to a wedding table with the monogram of the happy couple. Add pumpkins and acorns for a […]

  2. […] Bed DIY by Dear Emmeline Fall Centerpiece by Love of Family and […]

  3. […] to the tutorial: Rustic Fall Centerpiece by Love of Family & […]

  4. […] Rustic Fall Centerpiece from Love of Family and Home […]

  5. […] left > right 1. Homedit 2. Wedding colors and Themes 3. Southern Weddings 4. Love of Family and Home 5. Capitol Romance 6. Glass vases with leaves ~ DIY 7. […]

  6. […] Gourds Centerpiece – The Scrap Shoppe 15. Outdoor Centerpiece – Just Paint It 16. Rustic Fall Centerpiece – Love of Family and Home 17. Fall Tablescape – The Cards We Drew 18. Fall Felt Centerpiece – Lines Across 19. […]

  7. […] one of my faves is this Rustic centerpiece from Tonya at Love of Family and Home. She shows us how to make this beautiful centerpiece with the natural elements she uses in such a […]

  8. […] Rustic Fall centerpiece by Love of Family and Home […]

  9. […] vignette is probably my favorite part of my “fall tour.”  I was inspired by this photo and when I found one of these tree slabs (?) at Hobby Lobby, I used my 50% coupon to make a deal. […]

  10. […] DIY Rustic Bulap Centerpiece from Love of Family and Home: Simple and easy, this centerpiece starts with a wood slab and is topped off with burlap and paper flower embellished vases. I love the scattering of acorns! […]

  11. […] Take the focus away from the bright orange and yellow. Coordinating your centerpiece colors will bring out the natural textures of wood, burlap and acorns used. (via Love of Family and Home) […]

  12. […] Rustic Fall Centerpiece from Love of Family and […]

  13. […] make These are from Cameo Cottage Designs  If you love it too and want to make some then visit: Love of Family & Home here: for Tonya’s […]

  14. […] Addict Trick or Treat Bag by A Pumpkin and a Princess Weathered Bed DIY by Dear Emmeline Fall Centerpiece by Love of Family and Home Fall mantle via the Lilly Pad Cottage As always, thanks for hanging […]

  15. […] or Treat Bag by A Pumpkin and a Princess Weathered Bed DIY by Dear Emmeline Fall Centerpiece by Love of Family and Home Fall mantle via the Lilly Pad Cottage As always, thanks for […]

  16. […] Mason jar, or you could add jars of different sizes to make the whole display! To make your own pretty rustic fall jar centerpiece, follow Love of Family and Home’s […]

  17. […] Rustic Fall Center Piece […]

  18. […] to stash again! If you love that will too as well as want to make some then visit: love of family as well as the key here : tutorial Tonya’s until she shows how to make that will paper fun cute […]

  19. […] Fall Centerpiece by Love of Family & Home are simple and easy to make.  You can personalize them with your own […]

  20. […] credits: Love of Family and Home, bhg.com, Worthing Court, bgh.com, IN Photography, Countryhome.com,Katy Oppold via Pinterest, The […]

46 Flares Twitter 0 Facebook 2 Pin It Share 38 Google+ 6 46 Flares ×